Chocolate Mousse Cake with Ladyfingers
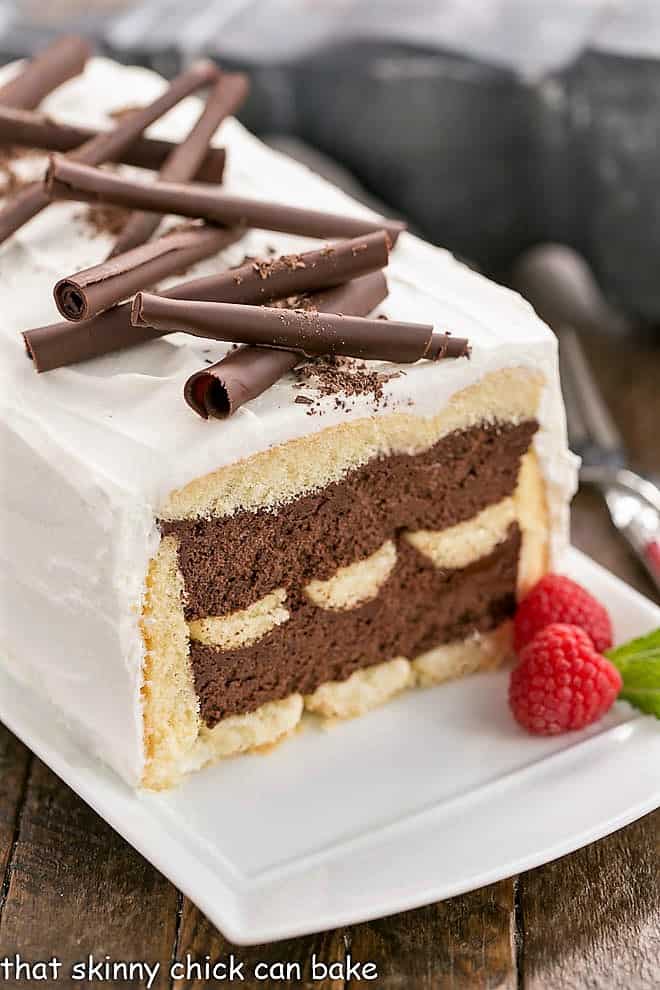
This Chocolate Mousse Cake is perfect for any celebration! The mousse is deliciously rich and creamy, and there is absolutely no baking involved!
This Lady Fingers Dessert takes the work out of making a dessert. Using store-bought ladyfingers for structure makes this Mousse Cake Recipe a breeze to prepare!
Why You Should Make this Lady Finger Cake
- If you feel your baking skills are lacking, here is an easy, decadent chocolate mousse cake recipe that requires absolutely no baking!
- Made with grocery store ladyfingers, homemade chocolate mousse, and a whipped cream frosting, all you need is a mixer and rubber spatula, and a little patience as it chills.
- This is fancy enough for company or holidays, yet easy enough for any occasion.
Recipe Tips
- The hardest part about this recipe was finding soft, spongy ladyfingers. Since one of our major grocery chains went out of business, I had only seen the harder version used for tiramisu.
- When I finally located some, I snatched up two packages knowing I was way overdue to make this cake. Even though the packages stated 3 ounces on the label, it took part of a 3rd package to cover my loaf pan. So back to the market I went!
- PRO-Tip: Beware that the mousse layer of this cake contains raw eggs. If you plan to feed this dessert to any children, older folks, or anyone who has a suppressed immune system, you need to find some pasteurized eggs. See below how to pasteurize at home.
- Pasteurized eggs are gently heated to kill any food-borne bacteria without cooking the eggs. They have become more difficult to find locally just like soft ladyfingers.
- If you’re a mousse lover but worried about salmonella, I have a chocolate truffle mousse that’s actually cooked so it’s safe for all. But it wouldn’t necessarily work in this cake without some trial runs.
- As with many of my desserts, I use an offset spatula to smooth and level the mousse and spread the whipped cream over the cake.
- PRO-Tip: Did you know whipping the cream in a bowl that’s been chilled in the freezer helps stabilize the whipped cream?
- Adding powdered sugar instead of granulated sugar also helps the whipped cream from separating (while providing that needed touch of sweetness). It will still eventually separate, but using the powdered sugar extends the usable time frame.
How to Garnish
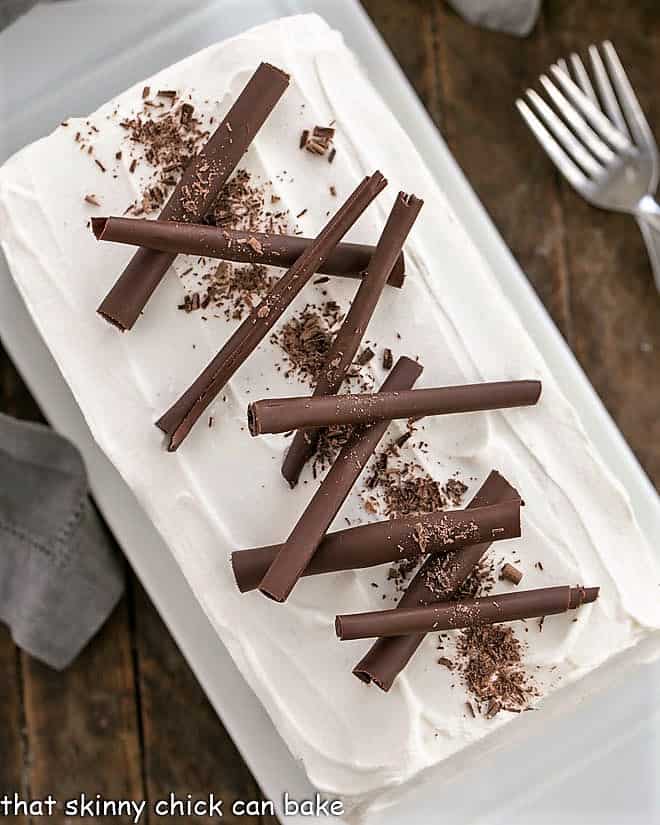
- Chocolate is always the easy answer when making a chocolate dessert. I made chocolate curls and then added some grated chocolate to finish it off.
- Chocolate shards are easier to make than curls and are also impressive. But if you see any beautiful red berries in the market, that’s another option.
- Years ago, when I first made this mousse cake, I placed a line of ripe raspberries down the center of the cake. It was simple and the red popped on top of the white whipped cream frosting. Strawberry halves would be another alternative.
How to Make
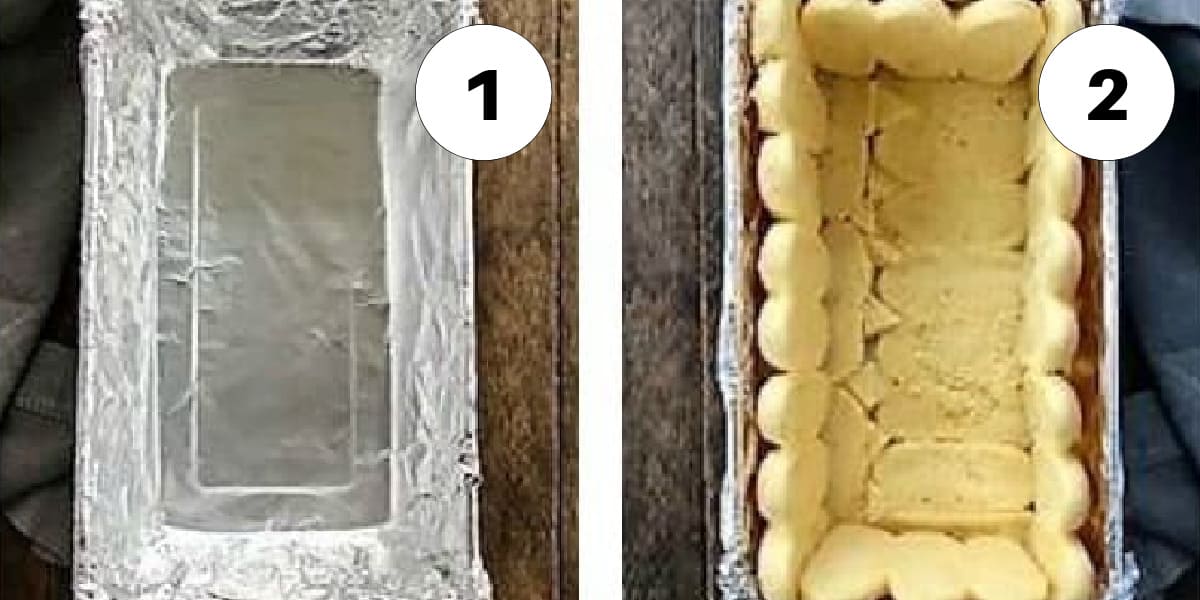
- Line your loaf pan with non-stick foil. It will help you remove the cake after it’s chilled and before it’s frosted.
- Next, Line the pan with ladyfingers, starting with the bottom, then the sides. Cut pieces from the leftover ladyfingers to fill any large openings.
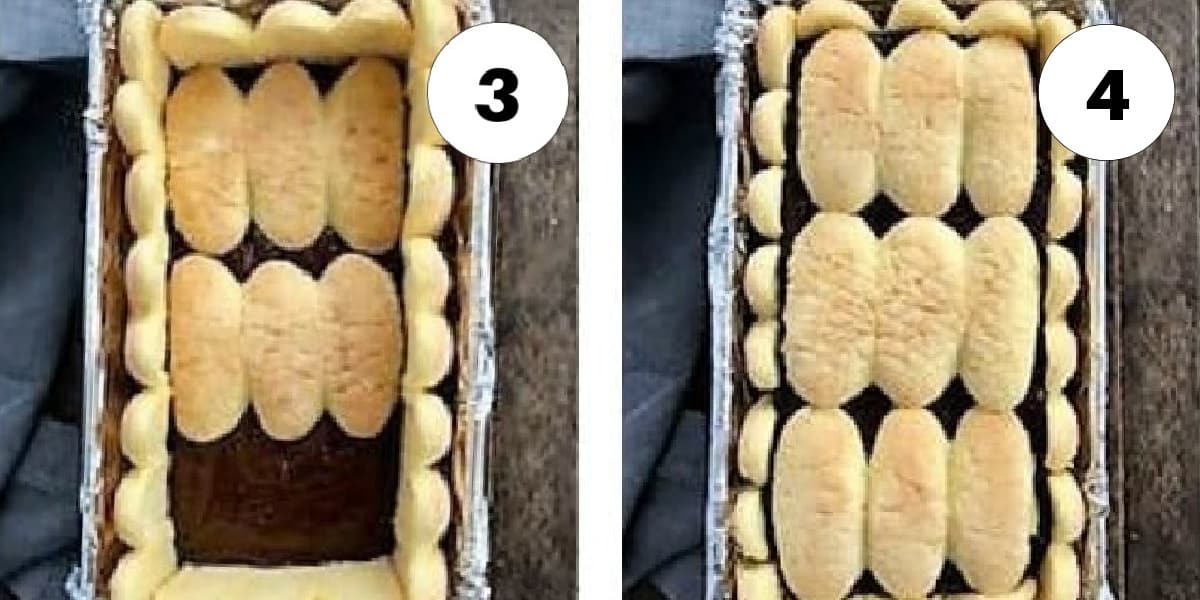
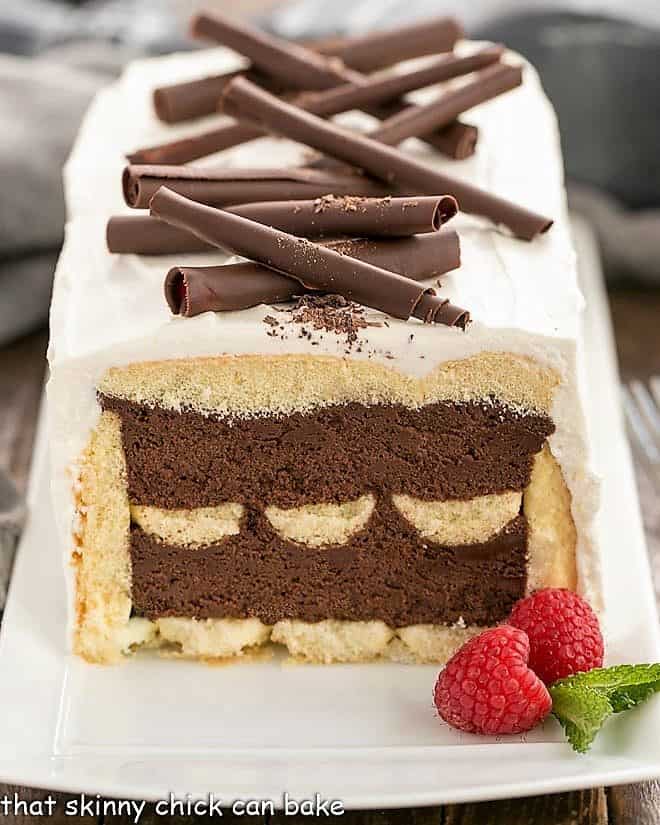
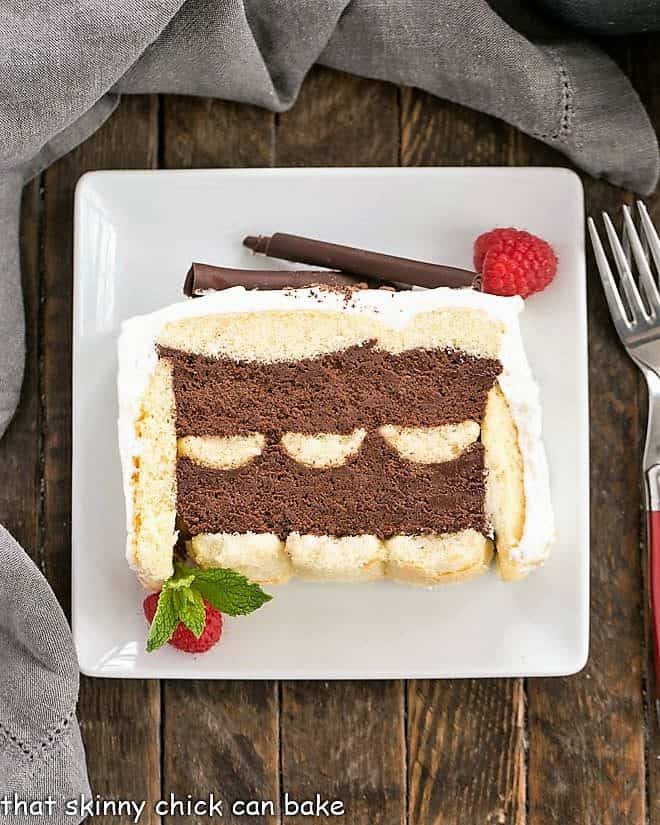
- Layer half the mousse over the ladyfingers on the bottom of the pan, followed by the rest of the mousse, then more ladyfingers.
- Cover with plastic wrap, chill as directed, then invert on a serving plate, slice, and serve.
“Incredible,” was the first word out of Bill’s mouth. He claimed not to like ladyfinger desserts before tasting this one. It’s really quite simple to whip up. I might even up the amount of whipped cream icing next time to make it nice and billowy. It was the perfect way to end our holiday meal.
Frequently Asked Questions
Called ladyfingers because they’re shaped like a lady’s delicate fingers, and their texture can be cake-like or cookie-like. They are also known as boudoir biscuits, sponge biscuits, sponge fingers, Naples biscuits, or biscuits alla cuiller depending upon where you’re located.
Ladyfingers have been around since the late 15th century. This recipe uses the soft, spongecake ladyfingers. The harder version is known as Savoiardi.
Either pound cake or sponge cake can be cut into the shape of ladyfingers and used in place of soft ladyfingers in a recipe. Biscotti may be used in place of hard ladyfingers if it makes sense with your recipe.
Since pasteurized eggs are almost impossible to find in the markets, to make this dessert safe for the young, elderly or immune-compromised, you can pasteurize your eggs at home. One good method is found on Simply Recipes.
You May Also Like:
- Classic Lava Cakes
- Frozen Chocolate Mousse Cake
- Chocolate Layer Cake
- Plus, more of my Best Chocolate Recipes

Chocolate Mousse Cake with Ladyfingers
A layered ladyfinger and chocolate mousse cake that's both elegant and delicious!!!
Ingredients
- 2-3 (3 ounce) packages of ladyfingers
- 18 ounces semisweet chocolate, chopped
- ¼ cup powdered sugar
- 7 egg yolks (pasteurized eggs preferred)
- 5 egg whites
- 1 ½ teaspoons vanilla
Topping:
- 1 cup heavy cream
- ¼ cup powdered sugar
- 1 teaspoon vanilla
- Raspberries or chocolate curls to garnish
Instructions
- Split ladyfingers and arrange them on the bottom of a 9 x 5 x 3-inch loaf pan lined on all sides with either parchment or non-stick foil. Trim ladyfingers to fill any empty spots. Set aside.
- Melt chocolate with 3 tablespoons of water in the microwave. Start, stop, and stir at 30-second intervals till the chocolate is melted and smooth. The mixture will be thick.
- Stir in powdered sugar, egg yolks, and vanilla. Beat till smooth. Allow it to cool.
- Beat the egg whites till soft peaks form. Mix some of the whipped egg whites into the chocolate mixture, then fold and mix in the rest till completely combined.
- Spread half of this chocolate mousse over the ladyfingers, then place a second layer of ladyfingers over the mousse.
- Top with the remaining mousse and then another layer of ladyfingers. Cover with foil or plastic wrap. Chill for at least 6 hours or overnight.
- To serve, whip heavy cream with powdered sugar and vanilla. Invert the pan onto a serving plate and remove the foil or parchment.
- Frost the cake with whipped cream and garnish with berries or chocolate curls.
Notes
Recipe courtesy of Sue Thomson. Look for ladyfingers in the bakery area of a large grocery store. They're more likely available around the holidays.
Recommended Products
As an Amazon Associate and member of other affiliate programs, I earn from qualifying purchases.
Nutrition Information:
Yield:
10Serving Size:
1 sliceAmount Per Serving: Calories: 409Total Fat: 28gSaturated Fat: 16gTrans Fat: 0gUnsaturated Fat: 10gCholesterol: 161mgSodium: 49mgCarbohydrates: 41gFiber: 3gSugar: 35gProtein: 7g




93 Comments on “Chocolate Mousse Cake with Ladyfingers”
I have made a very similar version of this. I use German chocolate instead. Gives a much richer mouse taste
Thanks, Mary! I’ll have to try German chocolate the next time I make this!
Can I use hard lady finger soaked in either milk or coffee?
I think the hard ladyfingers would could get too mushy or on the other hand, not get soft enough. I’d use a pound cake and cut it into strips like ladyfingers if I had to find another option. Let me know how it goes if you give it a try.
My mother in law used to make a ladyfingers cake that we all LOVED. I have forgotten about it. Thanks for the step by step. This looks delicious – Visiting from Gluten Free A-Z Blog
Hi Liz I wanted to post a comment, if its ok to make this cake a low cost way like use a box of instant chocolate pudding? I have a large box of chocolate pudding that brought from ALDI the other day, so I thought I could make something with it and a pack of ladyfingers crackers. I mean a low cost cake especially when prices went up on baking goods and it makes it harder to put some of these recipe become reality.
Hi, George,
You can definitely use pudding instead of mousse. It most likely won’t firm up like the mousse does, but I’d just serve it in small bowls instead of on a plate. Enjoy!!
This cake is SO pretty and looks both elegant and so so so delish!
The mousse looks like as a feather and gives me another reason for me to buy a new loaf pan. This would be a great Easter dessert also.
Stunning cake, Liz! The layers are so pretty!
That is so pretty! I need to give it a try!
Another stunning dessert Liz, no wonder Bill loved it.
The best dessert I’ve had in a long time! Definitely a keeper!
This is such an amazing treat! Everyone loved it!
I am a big fan of mousse in my cakes!! Thank goodness for all of your tips! It looks amazing.
We have no trouble getting those sponge biscuits here – they seem to be in every shop you walk into. Your chocolate curls are perfect. Because it’s so hot here at the moment, I’m whipping cream in stainless steel bowls I had in the freezer for a few minutes. Like you say, it really helps. This cake/dessert is absolutely stunning. Wonderful presentation xx
Love this Lizzy ! looks really delicious !
Looks so gorgeous when it’s cut. Everyone loved it!
I’m not a coffee drinker so this appeals to me more than tiramisu. It was AMAZING!!
Wow! I love chocolate mousse cake! This one has lady fingers in them, nice! So lady fingers are not just for tiramisu 🙂
Awesome recipe, & love those tips! xoxo
My mom used to make something like this, it brings back lots of delicious memories!
I wish I could sneak my pinky finger through the PC screen and sneak test a taste of this delicious looking cake.
Gorgeous cake!!
What a gorgeous and easy cake! The mousse look oks rich and creamy. I usually stabilize my whipping cream with a little gelatin and that way it’s still good the following day.
Liz this looks fantastic and you offer So many useful tips.
I’m shocked that I haven’t commented on this recipe before but will definitely be saving it to try in the near future.
I’ve never made a refrigerator cake… Now I feel like I need to:@)
Love this recipe.. so easy and so yummy ???????????????????????????????????????? I love chocolate very much.
I’m so glad, Sara!!! Glad it was such a success 🙂
Liz, had so much fun making this for SRC! And it was SOOO good. It won rave reviews at my dad’s bday party – both for presentation and deliciousness!!! Thanks!!!
A chocoholic like me will grab this for sure! Thanks a lot for sending this awesome entry to my event! Eagerly waiting to see more of your creativity!
What a gorgeous cake Lizzy!! And I need that puff pastry wrapped apple, it’s on my to-do list. Happy New Year 🙂
What a fabulous spread for a New Year’s Party! Looking forward to another year of your wonderful recipes, Lizzy.
Beautiful dessert! Happy New Year!!
Hello dear Lizzy,
Wish you a very happy New Year 2012!Seems like you guys had a rocking party:) Your Chocolate Mousse looks out-of-the-world – Congratulations on the Top 9 too!!
Oh wow, the lady fingers combined with chocolate mousse sound absolutely to die for!! 🙂
Happy new year!
I love anything chocolate, and this one looks so sinful! Thanks for sharing. Glad to virtual party & bake along with you! Happy New Year, Skinny Chick!
Everything looks so good! Thank you for sharing and congrats on Top 9. 🙂
Hi Liz! My Mama calls me Liz.
This looks wonderful!
Thank you for the recipe.
Charlie
Congratulations on Top 9, great way to start the new year!
Such a great post! I love this recipe and I still drool over those chocolate chip cookie dough brownies and baked apple! Happy new year!
Although cakes and cookies looks amazing. Just one week ago, i have tried to bake triple Chocolate cookies and cakes and i did have bake it very well.
Happy New Year to you as well! Those cookie dough brownies look right up my alley. I LOVE cookie dough, sometimes more than the actual baked cookies. 2011 was fun, looking forward to seeing what you cook up in 2012.
That cake looks amazing, as does the rest of your re-cap!
Happy 2012 Lizzy 🙂
Lizzie, of Food and Thrift Finds, was my first friend on foodbuzz, showing me the ropes and encouragement…and still dear to me after 1 1/2 years of blogging. Her sweet daughter, Lora, is hosting this party!
Lizzy-I’m so sorry to just notice your mention about me…I’ve been so sicke since about a week ago with the flu, that I didn’t want to mention on my blog, and it has gotten worst for New Year’s Eve! Thank you so much for the mention abt me. I’m really touched by your sweet words, and I do treasure our friendship since day one!
Your roundup of recipes is superb, as your fabulous baking that I so admire!
I’m on a new mission now, and will be posting about it!
xoxo
You’re killing me with all of these delicious sounding sweets! I’ll have to try one of them. Happy New Year!
this cake breaks the rule to every healthy resolution. I’m so loving it!
Happy New Year Liz!!
This cake is a beautiful way to close off a wonderful year for you. All the best in 2012.
Happy New Year, Lizzy! I’m so glad to have found you and your wonderful blog this past year! This mousse cake looks incredibly good!
All the sweets look luscious, but the chocolate mousse is definitely the winner if I were to vote 😉 I have made chocolate mousse for Christmas instead of a cake and it was such a delightful change!
Happy New Year!
This cake would have disappeared really quick if we’d had it over the holidays. Happy New Year and looking forward to more of your great posts.
Among all I will go for the wrapped Apples and that simply looks fantastic, unique and creative.
I am admiring how you made the mousse cake with that different layers and beautiful contrast of colors.
Sounds amazingly delicious! Blessings for 2012!
Una ricetta meglio dell’altra!!!
Spettacolari!!! Tutte golose e molto belle!!
Ti Auguro un Felice e Sereno Anno Nuovo!!!!
Baci!!!!
Your mousse cake looks divine! Happy New Year Liz! xx
Happy New Year! Your blog is so full of chocolatey treats I feel like I’m in heaven! 😀 I love mousse cakes. 🙂
Happy New Year!
I hope 2012 will be full of health, love and happy moments!
You know, if I ate more of these I wouldn’t have a problem with being so thin anymore. 😛
I seriously thought I left you a comment for this gorgeous cake, but I guess I only dreamt I did, LOL! You cake sounds wonderful, and I adore how shiney and beautiful those black gold cookies look! Happy New Year my friend:-) Hugs, Terra
What a wonderful recap of 2011 of some of your scrumptious recipes here and favorite bloggers. Thanks for joining #Welcome2012 and making it a wonderful event. Hope to stay connected for more of foodie fun together in coming years!
Wishing u a very happy new year
A beautiful round up and an incredible chocolate mousse cake – all the very best for 2012 to you and your family
Mary oxo
Happy New Year to you! What a pretty cake to celebrate 2012 with.
Happy New Year Liz! I’m a huge fan and I enjoy all of your wonderful recipes. But in particular, I am always in awe of your baking. This cake looks beautiful! I wish you and your family all the best in the year to come. And I look forward to seeing what amazing things you create this year! All the best to you! : )
What a mouth-watering cake! Yum!
Have a great New Year!
All great choices. I want to wish you a wonderful New Year for 2012 filled with health, loved ones and success in your endeavors.
Happy New year 2012, Lizzy!
I wish you and your family especially health, because when it is, then there is joy and love, and success, and hopes and dreams come true!
You are just dangerous – here I am with a fridge stacked with zucchini and arugula (and a little cheese) and you bring in chocolate mousse. You knew I couldn’t resist that, didn’t you? Well, I shall try – until Valentine’s Day… and then it will visit. Here’s to a year of sweet days… and arugula.
Lizzy, you’ve been such an inspiration & consistent & helpful friend! Your recipes are magnificent! Hope you and yours have the sweetest New Year! Thanks!
This cake looks wonderfully sinful and delicious… what a great recipe! I love this post recap and the pastry-wrapped caramel apples. What a fun and creative recipe! I hope you had a wonderful New Years and I look forward to viewing all the other tasty treats you’ll be posting in the future.
I am a chocoholic, I simply cannot resist, especially to treats like these! Have a beautiful New Year 2012!
All of those look utterly delicious, Lizzy! how did I miss those caramel apples!? they need to be in my belly right now 😀
On another note, have a wonderful, happy 2012 filled with love and joy, my friend. <3
Beautiful Chocolate Mousse cake to ring in the New Year!
Aw you are going to make me cry. Thanks so much for that my friend. That brightened my day in a big way. Rough week, this was just the pick me up I needed to put a smile on my face. Happy New Year my friend, may it be filled with blessings and lots of food, preferably chocolate! xx
Happy New Year, Lizzy! The cake looks amazing!
mmm those peanut truffle brownies are lovely and so is the first cake with always present divine raspberries 🙂 Are those real or plastic ones, Lizzy :)))) Just kidding 🙂
Your cake looks terrific, as do the chocolate chip cookie dough brownies. Too bad I’ve given up chocolate for a month!
Looks great! I hope you bring as many awesome recipes in 2012 as you did this year! 🙂 Happy New Year!
So it seems that most of your favorite recipes include chocolate. I knew I liked you for a reason. 🙂 That mousse looks divine!
What a sweet post!! Happy New Year!!
Happy new year, my lovely friend. This dessert looks fabulous, I love the lady fingers. I hope your year is filled with blessings. I’m looking forward to all the deliciousness! 🙂 xo
Lizzy- Your chocolate Mousse cake is just another one of your glorious chocolate creations. You should publish a cookbook!
I am grateful that we are foodie blogger friends, and can’t wait to see what’s in store for 2012!
happy 2012!
Awww.. Lizzy!! You are so very sweet to include me in your post. I am beyond honored. 🙂 I have really enjoyed getting to know you and help each other out. I call you the complete foodie package… you are an amazing cook, fabulous baker and all around wonderful human being. 🙂 I wish you success and prosperity this year and hope 2012 is simply the greatest for you and your family!! All the best my dear friend! Happy New Year! ~ Ramona xxoo
Ok, your secret is out, you are a chocoholic! 3 out of 4 favorites contain chocolate, but I have no problem with that-yum! Happy New Year!
Happy new year. The top 4 look awesome, actually everything on your site is awesome. I will ask my parents whether I am up for adoption:)
Happy New Year Lizzy, your photos are always inspiring to me and recipes it keeps me trying to be as great as your are in both! I love how you support this cyber world, you had a delicious year for us you shared! looking forward to more! THANKS for mentioning me here, I am blessed to have met you… thanks again and have a healthy 2012~
Your chocolate mousse cake looks so yummy! I also love the pastry wrapped caramel apples. That recipe I have to give a try! I’m a sucker for anything that has apples.
I wanted to wish you and your family a Happy New Years! I’m so glad we became foodie blogger friends! I absolutely love your blog and I can’t wait to see what recipes you will post this year.
By the way, your White Chocolate Raspberry Bars, I must of made them 3 times now. I love them and so do all my friends!
Happy New Years!
What an incredible looking cake! happy new year!
Wish you and family a very happy new year:-)
The Mousse cake looks just awesome:-)
Cheers my friend!!! That cake looks AMAZING:-). I will be going and checking out the recipe for the Chocolate Chip Cookie Dough Brownies, OH MY YUM:-) Hugs, Terra
It looks incredible!
Happy New Year!